Imagine you’re working on a big project, and you notice that some Revit® elements that had been modeled a few hours or even days agoare missing. That might happen on workshared projects when team members don’t own worksets, and everybody can edit anything. So, sometimes someone might accidentally delete someone else’s elements.
To transfer the missing elements, you need to find a backup file where the elements are still in their place, or a local copy of the project that wasn’t synchronized with the central file for some time (and has the missing elements in it).
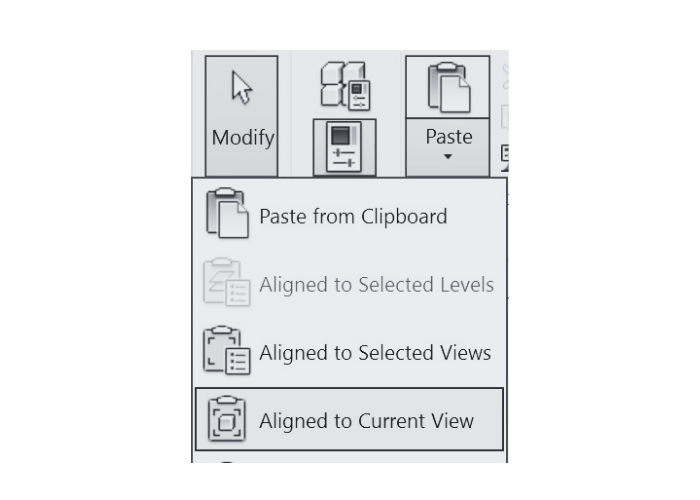
Now you have to open both projects in Revit. The best way to transfer elements is in plan views, so activate in both projects same-level plan views. Mark the elements in the project where they are still in their place (you can use right click and Select All Instances >Visible in View or just select all and filter the required elements).
Autodesk® Revit® can save a lot of time when you’re working on large projects or multiple similar projects. What you want to use here are Revit project templates.
Revit users can save system families (walls, floors, etc.), component families (doors, windows, furniture, etc.), sheets, schedules, annotations, graphics, and so on to their project templates. This can save a lot of time when starting a new project because you skip over the creation of schedules or importing needed families. Each project is different, however, and we can’t create a template that will suit all projects. Even if we create a few templates to choose from for a new project, the chosen template won’t fit it 100%.
There are even situations when, for example, schedules from multiple different projects have to be used in a new project. Also, sometimes beginners forget to use the required project template and have problems transferring their work to a project template. There is a partial solution for that using Revit project linking, binding it afterward, but losing annotations, detail items, views, etc., but that’s a topic for another post.
First of all, let’s see how the system family types, annotations, tags, view templates, etc. can be transferred between projects (those are just types, not designed elements of the project).
The beginning of the 20th century was a very exciting time for builders and architects as they witnessed the birth of steel and concrete structures. The ingenious mix of these two components made it possible to build much higher than ever before, and that eventually led to the construction of skyscrapers. Wood as a building material seemed like a thing of the past. More than 100 years later, however, architects are once again thinking about using wood as their main building material. There are already apartment blocks built entirely of cross-laminated timber, and some ambitious companies are preparing blueprints for the first wooden skyscraper.
CLT reduces the carbon footprint
Turning towards wood might seem like a weird idea, to say the least. Why reintroduce something that burns and easily breaks? Isn’t that the reason why we moved on to concrete and steel? That is true to some extent since regular timber is neither malleable (unlike steel or concrete) nor strong enough to build high-rises. Read more »
Q: How can I frame an opening for a set of pipes passing through a wall and make individual openings for each one in the sheathing layer?
A: While there are other workflows, the one I’ll describe below seems to be the simplest with the least steps and configurations. The following steps will lead to this end result for your pipes:
1. You have to create Opening configurations for your pipes (ducts, etc.), which will insert simple round openings for your pipes (you can use one configuration for all sizes) but will join those openings into a rectangular framed opening, in case the pipes are close to one another (second screenshot):
AGACAD’s software is constantly being improved with newly-conceived features based on our clients’ experiences and needs who are BIM professionals in their industries. Having received some requests regarding our metal wall framing software and thoroughly looking into the possibilities with our clients, we’re ready to unveil several new and improved features that have been added to Metal Framing Wall+ and are available for all users. All you need to do is update the tool via the TOOLS4BIM Dock and then you’ll be off and running with the latest functions for framing metal walls.
So, what’s new exactly? Let’s get right into it.
Load Additional Types
When you use the “Load Families & Schedules” command, only some example family types are loaded into the project:
However, if you need some additional family types, you don’t need to look for those families and types through the native Revit “Load Family” dialog anymore. Read more »
It’s about time for some news on the truss front. Our programmers and engineers have been hard at work developing the Metal Framing Truss BIM Solution so that it would allow users to incorporate floor trusses in their Revit® framing projects. Let’s see the fruit of their labor!
This time we are sharing our Tips&Tricks article that was published in RevitCommunity some time ago. Hope it can be useful not only for RevitCommunity readers but for our blog followers too. So please read and benefit from advices on how to work smarter without using Revit plugins.
To get more realistic and high quality render requires a lot of time working on details. However we don’t always need to have exact details or spend time on them, therefore there are big model libraries on the internet for rendering purposes. Those might contain trees, grass, site elements, furniture, and so on.
Unfortunately those are usually not suitable for Autodesk® Revit® as they are mostly used by visualization professionals who use visualization software like 3ds Max, Cinema 4D, etc. However we can get quite good results using one of the suggested Revit rendering engines.
First, I would suggest you to begin with a separate Revit project for our rendering and then just link the main project into it. In that case, we won’t overload our main project with all detailed geometry that will be used only for rendering purposes.Read more »
As the software, hardware and technologies are always improving we would like to have more and more information in our BIM models, and we would like this information to meet BIM criterions – it must have its geometry, materials, actual quantity and all the information we might need about some parts of the project or its elements
Often various detail drawings or just detail elements we draw in 2D, mark its places in the project and calculate approximate quantity. We usually do that because our clients don’t ask for these details as those are being coordinated at the construction site, or distribution of these detail elements takes too much time. However various details are quite important in our projects, especially in precast elements or structural models.
Fortunately, there is a new BIM solution that quickly distributes detail elements or even specific cuts to your Revit® elements according to predefined rules – AGACAD team has created a new BIM solution for Revit called Smart Details. The tool is currently in Beta version, however everyone can try it out for free. After the installation of the tool you will see a new tab in your Revit ribbon with Smart Details tool’s functions inside.
All functions are quite similar and their names are self-explanatory, therefore it’s quite obvious what they are for.
Again, we would like to share advice on how to work smarter with Revit® without using any plugins. Just a simple but useful tip.
Sometimes not everything can be finished in Autodesk® Revit®, so we need to use another software for some tasks. In some cases we need to have 3D view (axonometric or perspective) drawing of our project outside of Revit, so that it can be edited or simplified (for example for logo or advertisement).
The problem is that if you export 3D view, you get 3D model of your project and it’s complicated to make it 2D (“Flatten” command in AutoCAD doesn’t work properly in most of the cases). However there is a simple solution for that.
All you have to do is just follow a few simple steps:Read more »
This site uses cookies - they help us provide you with a better online experience. By using our website you accept that we may store and access cookies on your device. | Privacy policy.
This website uses cookies to improve your experience while you navigate through the website. Out of these, the cookies that are categorized as necessary are stored on your browser as they are essential for the working of basic functionalities of the website. We also use third-party cookies that help us analyze and understand how you use this website. These cookies will be stored in your browser only with your consent. You also have the option to opt-out of these cookies. But opting out of some of these cookies may affect your browsing experience.
Necessary cookies are absolutely essential for the website to function properly. This category only includes cookies that ensures basic functionalities and security features of the website. These cookies do not store any personal information.
Functional cookies help to perform certain functionalities like sharing the content of the website on social media platforms, collect feedbacks, and other third-party features.
Performance cookies are used to understand and analyze the key performance indexes of the website which helps in delivering a better user experience for the visitors.
Cookie
Duration
Description
YSC
session
This cookies is set by Youtube and is used to track the views of embedded videos.
Analytical cookies are used to understand how visitors interact with the website. These cookies help provide information on metrics the number of visitors, bounce rate, traffic source, etc.
Cookie
Duration
Description
_ga
2 years
This cookie is installed by Google Analytics. The cookie is used to calculate visitor, session, campaign data and keep track of site usage for the site's analytics report. The cookies store information anonymously and assign a randomly generated number to identify unique visitors.
_gid
1 day
This cookie is installed by Google Analytics. The cookie is used to store information of how visitors use a website and helps in creating an analytics report of how the wbsite is doing. The data collected including the number visitors, the source where they have come from, and the pages viisted in an anonymous form.
Advertisement cookies are used to provide visitors with relevant ads and marketing campaigns. These cookies track visitors across websites and collect information to provide customized ads.
Cookie
Duration
Description
_fbp
3 months
This cookie is set by Facebook to deliver advertisement when they are on Facebook or a digital platform powered by Facebook advertising after visiting this website.
fr
3 months
The cookie is set by Facebook to show relevant advertisments to the users and measure and improve the advertisements. The cookie also tracks the behavior of the user across the web on sites that have Facebook pixel or Facebook social plugin.
IDE
1 year 24 days
Used by Google DoubleClick and stores information about how the user uses the website and any other advertisement before visiting the website. This is used to present users with ads that are relevant to them according to the user profile.
test_cookie
15 minutes
This cookie is set by doubleclick.net. The purpose of the cookie is to determine if the user's browser supports cookies.
VISITOR_INFO1_LIVE
5 months 27 days
This cookie is set by Youtube. Used to track the information of the embedded YouTube videos on a website.