Two related questions often come up about our MEP Hangers tool for Revit, usually during training sessions or a short time after beginning to use the software.
“How do I put hangers on a duct or pipe over insulation? And how do I make it so hangers that I create myself will account for insulation too?”

These have to do with how to transfer information from MEP elements to hanger families in your project.
You can control this using two parameters inside the hanger family. What you need to do is create a parameter that copies the thickness of the insulation from the MEP element to the hanger family and another parameter that controls whether the insulation thickness is added to your hanger size. Here’s how to make those parameters.
Step 1
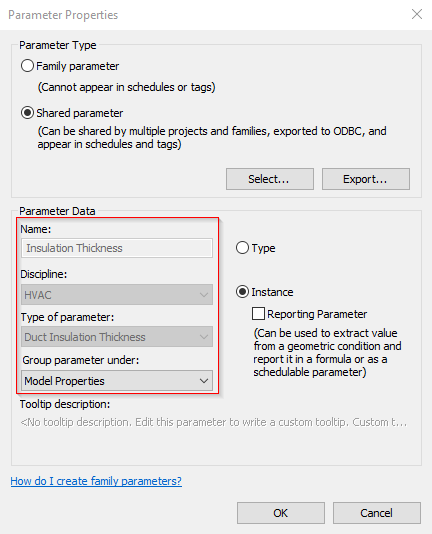
Create a parameter that copies the “Insulation Thickness” value from ducts or pipes into your hanger family.
Use our MEP Hangers Revit extension to do this because it lets you copy different parameter values from interconnectable MEP and structural elements into the connecting hanger family. MEP-element (host)-related parameters are transferred under the “Model Properties” parameter category.

You can make that parameter using the settings as shown below. One important note though – make sure that ‘Discipline’ and ‘Type of parameter’ are the same as the parameter that is being copied from the MEP element. In this example, it’s a hanger for ducts, so I’ve set the parameter data as seen below:

Step 2
Now that you have the insulation thickness value in your family, you need to create an ON/OFF switch to control whether you want to add that value to your hanger size. This can be done with a “Yes/No” type parameter. In our families, we call it “Over Insulation”:

When turned ON, this “Type” parameter adds the “Insulation Thickness” value to the width of hangers placed on ducts that have insulation.
And that’s all there is to it! Now you can control whether your hangers account for insulation or ignore it:
| Hanger ignores insulation: | Hanger accounts for insulation: |
 |  |
So, to summarize, what you need to do is:
- Create a parameter that copies the “Insulation Thickness” value from the MEP element to the hanger family. (Our MEP Hangers Revit plugin is necessary to do this.)
- Create a parameter that controls whether the thickness of the insulation is added to your hanger size. (You can do this in plain Revit.)
For your good-to-know file, when you purchase our MEP Hangers Revit-based software, we provide a sample project that contains a limited selection of hanger families. Most of those already adjust for insulation.


