In case you missed it, the user interface of our framing software for wood and metal walls and floors got a makeover this past July. Changes to the UI can be seen in Wall+ and Wall+M as well as Floor+ and Floor+M. This UI update will be applied to our roof framing solutions for Revit in the coming weeks, so stay tuned!

Although the UI certainly looks different, rest assured that all previous functions are still there; they’ve just been re-arranged and complemented with icons. To see where commands can be found in the new UI of Wall+ and Floor+, check out the images of the ribbons below. (Wall+M and Floor+M are very similar, respectively.)
Exploded view of WALL+ functions

Exploded view of FLOOR+ functions

In the images below, you can see the tool-tips that appear when the mouse hovers over a command in the main or secondary ribbon.
WALL+ tool-tips

FLOOR+ tool-tips

In addition to revamping the UI, we added the following new features.
Framing reports & suggestions
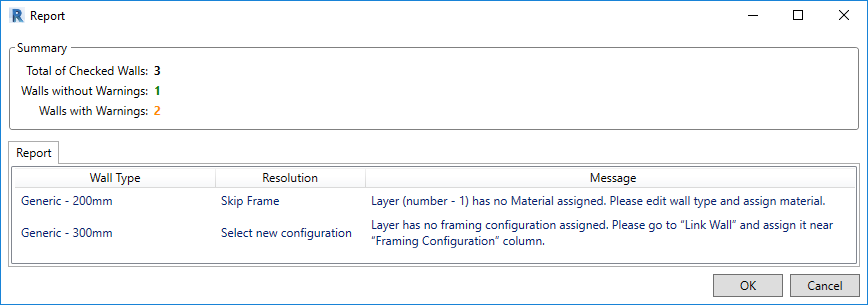
After selecting walls or floors and using “Frame Wall/Floor”, the tool automatically generates a report letting you know how many Walls/Floors were checked, how many and what kind of issues were found, and will provide a suggestion for resolving the issues:

Validate Walls
This feature checks whether the walls in the current project fit the predefined settings. Only validated walls should be framed.
In the example below, we checked a project containing five walls, and Wall+ found that one wall did not have a material assigned to its layer(s). In the Validation/Layers Report, we can see the Wall Type, Id number, and the “Message” informing us of the issue:

Update Part Parameters
This new feature lets you update part parameters from Sheathing/Paneling Configuration → Mark Settings — without needing to split the wall all over again. This is especially useful when you edit the parts manually after they were split using Split Parts and don’t want the changes to be affected. Also, it fills in the “HostMemberSortMark” parameter.

A new feature lets you set the desired numbering configurations in the Numbering Configuration window and then number all elements with one click using “Number Elements”.

And in Numbering Configuration, you can use the predefined configurations (just like in previous versions of Wall+ and Floor+) or the ones that were created using SortMark.

Current users: Be sure to download the updates to these solutions in the TOOLS4BIM Dock. We’d appreciate your feedback!
Potential users: Take a free 2-week trial of our robust Wood and/or Metal Framing BIM Solutions for Revit. Just download the TOOLS4BIM Dock, and select the Wall, Floor or Roof software you’d like to test out. We are ready to support you during your trial period and offer a free LIVE demo.
SOLUTIONS


Compatible with Autodesk® Revit® 2020, 2019, 2018
The definitive solution for wood/metal framing with Revit
Top Revit users call AGACAD’s Wood/Metal Framing Suite the most powerful and flexible BIM software on the market for constructions with multi-layer timber-frame or metal-frame walls, floors and roofs. That includes prefabricated panels, rafters and trusses, and great SIPs, CLT and post-and-beam solutions.
Advanced automation and built-in best practices help BIM professionals make optimal choices, move much faster, and avoid errors at every stage – from design and documentation to fabrication and construction.
It’s easy to quickly batch add, modify or mark just the right elements or parameters, distribute details, flexibly manage openings and connections, and find clashes. Frames dynamically update and adapt, ensuring that shop drawings and cut lists are always accurate.


